This lesson is from the course After Effects for Beginners, with David Bode. In this post, you'll learn all about how to use alpha and luma mattes in After Effects. This tutorial has easy-to-follow steps with plenty of useful creative examples.


In this lesson from After Effects for Beginners, with David Bode, you’ll learn about alpha and luma mattes and see examples of how they’re used.
To follow along in this lesson, make sure to open up the Mattes.aep file included in the downloads for this course. It will give you a project that looks something like this:

Some assets showcased in this tutorial will need to be downloaded from Envato Elements. Here are some links to stock videos and editable video templates to get you started:
What Is a Matte?
Matte is an abbreviation for track matte, and that’s when you use another layer to drive your target layer’s Opacity. We’re going to dig into the mechanics of how mattes function, and then we’ll get into how to use them.
To help explain let’s jump into the Alpha MATTES composition here and I’ll walk you through what is going on. At the bottom of the layer stack we have a green solid.

I’ll just solo that out there as you can see it’s nothing special, just a really bright green solid.

Above there is a layer named Pattern and this is a solid layer with a couple of effects applied to it. It has a Fractal Noise effect, and a Colorama effect, which is what is generating the pattern shown.

This pattern layer is getting all of its transparency information from the layer directly above it, and that’s because it’s set to Alpha Matte.

If I set this to no matte, you can see that it looks different. This is what the layer actually looks like.

But when I apply a Track Matte and set this to Alpha Matte, it’s going to be using the alpha information, which is the transparency of the layer to drive its transparency.
Let’s take a look at this matte layer right here and solo it.

Info Inspector
Let’s also take a look at this info panel which is usually located on the top right of the screen. You’ll notice right here we have a little column R, G, B, and A. This stands for red, green, blue, and alpha. The alpha channel is that pixel’s transparency.

Hover your mouse over your composition, and you’ll see that those numbers will dance all over the place.
255
The thing that I want you to look for right now is the number for the alpha channel. As you hover the mouse over this rectangle, you’ll see the alpha channel is reading 255.

And that’s because right now this project has a bit-depth of 8 bits. Each channel only gets 8 bits which means 256 values. Now you may be wondering why the alpha is reading 255 and not 256, and that’s because that last value there to get us to 256 is zero, so it starts at zero and ends at 255. This means that anything that reads at 255 is fully opaque, so it doesn’t matter what the color is. The color makes no difference to the value shown.

You can change the color to anything you want. As long as this rectangle has 100% opacity, it will be doing the same thing.
Now this larger rectangle has a gradient. Open that up and select it.

Then open up the fill so you can see how the gradient is working going from red to black. But again the color doesn’t matter because this layer is set to alpha matte, which means it’s only looking at the transparency.

So in this gradient the opacity for the gradient has been set on one side to 0 and on the other side to 100%.
Hide the Matte Layer again so you can see the image, and play about with the color values. You’ll notice that nothing changes.

Now start changing the opacity, and you’ll notice that the image starts to change. So when your fill layer is set to Alpha Matte or Alpha Inverted, it’s getting all of its transparency information from this layer’s transparency, not its color information.

There are two ways to set this up. You can set it to regular alpha matte, or you can set it to alpha inverted matte, which is the exact opposite. It’s as if I rebuilt this layer but I flipped all the opacity values.
How to Use Luma Mattes
Let’s look at another example. In this Luma Matte‘s composition, we basically have the same three layers. However, the pattern layer has been set to Luma Matte so it’s going to be getting its transparency information from the luminescence of the matte layer directly above it.
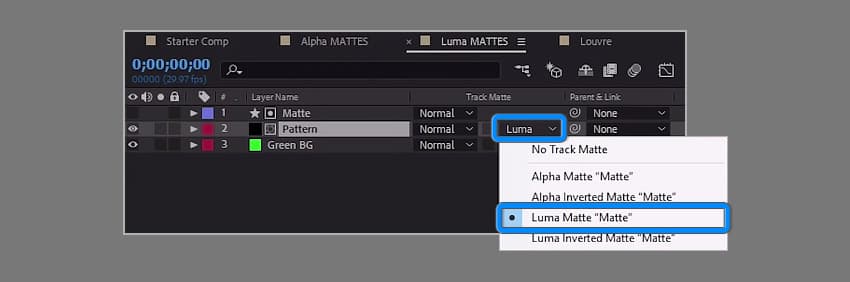
And if we solo that, you can see that this time it’s been set up to be black and white. That’s because things that are fully white (which will be read as 255, 255, 255 in the reading panel, which means that it is fully white) will be read as fully opaque when things are set to Luma Matte.

Things that are black are fully transparent. You can see that the gradient goes from black to white here, and that is what is being reflected with the pattern layer here.

Alpha Matte Project Example
Let me show you an example of how you might actually use Alpha and Luma Mattes in some real projects. Let’s jump over to the Louvre composition.

Now, in order to create this look, I’m using an alpha matte. So what I have going on here is a background layer which is a video clip with some effects applied to it.

I have a curves effect which is darkening it.

I have a third-party effect from Red Giants Universe called RGB separation, which is giving it this cool RGB split effect here.

And then I’m using a Gaussian Blur to blur it out.

On the layer that’s directly above it, you can see that there is a track now applied which you can also see just to the left of the layer name here. Those little icons indicate that this has a track matte applied.

If I set the track matte to None and the blend mode to Normal, you can see it’s just the same, exact footage layer as the one below.

When I set the layer back toAddandAlpha Matte it’s going to be using the layer directly above it for its transparency, and in this case that is a text layer.
So that is what is doing this ‘word cut out’ effect here. It’s just a simple text layer and an alpha matte.

Another Project Example
Let me show one other example here and walk through how it works. Right here I have a pre-comp called waves.

If I double-click on that we can jump inside that pre-comp and it’s here I have a footage layer with a couple of effects applied to it. It’s set to a blending mode of multiply.

Below there I have this paper texture layer.

And the idea is I just want some of that paper texture to show through on my footage layer.

If we jump in the Ink_Matte_2 comp, you can see that this is just a comp made of a bunch of ink drop elements that I found at Envato Elements, and I’ve arranged them to get this effect where it looks like the ink is bleeding from the center and expanding outwards.

Now, if I double-click on one of these layers, it will bring it up in the layer viewer. All these layers are black and white. But I’m combining all of these to use as one matte.

This is done by setting all of these layers here to Multiply, and then having a white solid on the background. So it’s essentially compositing them all on top of each other, and the effect is that I get one pre-comp that’s just black and white, using the ink matte as a track matte.

In this particular case, it’s set to Luma Inverted Matte. And that’s because all of those ink drops are essentially backwards for what I need. If I set this to Luma Matte, it does the opposite.

Congratulations
Congratulations! And that’s how you can use mattes for animation and to improve the look of your projects. Now that you’ve learned the basics, check out some of the other tutorials we have on Adobe After Effects below.


