Want to master time remapping in After Effects? Including step-by-step instructions, FAQs, and top tips, check out this guide on how to time remap in After Effects.


It’s 2023, and there’s still no simple console that allows you to time remap in After Effects. But not to worry – we’re here to walk you through the entire process from A to Z! By the end of this comprehensive guide on time remapping, you’ll be able to manipulate your video’s speed easily.
If you’re at the start of your After Effects journey and have clicked on this article out of curiosity, you might wonder what time remapping is. Well, let’s dive in!
What Is Time Remapping in After Effects?
Time remapping is a basic yet powerful core component within After Effects that allows you to manipulate the speed and timing of your media. When using time remapping, you can slow down or increase the speed of specific parts of your footage. Or, creatively, you could have your media abruptly halt, then start reversing. Ultimately, time remapping introduces a plethora of creative possibilities.
Understanding the Basics of Time Remapping
Before diving into the step-by-step process of time remapping in After Effects, it’s essential to understand some key concepts and terminology. You can use several techniques to achieve different time effects in After Effects.
Freeze Frame
The freeze frame does exactly what it says on the tin, creating a still image from a frame of your video clip. This creates a pause in the action and is commonly used for comedic effect. A freeze frame allows you to hold an image on the screen for a desired duration, adding impact to your video.
Time Stretch
Behold the mighty power of time stretch, which allows you to change the duration or speed of a clip without altering its visual content. With time stretch, you can make a clip shorter or longer, fitting it into a specific length or adjusting the speed to achieve your desired effect. This little trick is a godsend when synchronizing a clip with a particular timing demand.
Time Reverse Layer
As expected by the effect name, the time reverse layer effect plays a clip backward, either in its entirety or a specific section. This technique is commonly used for stylistic purposes or creating rewind-style effects.
Time Remapping
And the main star of our guide – time remapping. This versatile technique allows you to manipulate the time and speed of a clip throughout its duration. With time remapping, you can also create speed ramps, where the speed of the video gradually increases or decreases – a technique you can find throughout Zach Snyder’s early filmography.
How to Time Remap in After Effects: A Step-By-Step Guide
Now we understand the basic function of time remapping in After Effects, let’s learn how to apply this effect to your media.
Step 1: Import Media Into After Effects
First, import your media into After Effects by going to File > Import > File. Select the desired video or drag it into the composition panel.
Step 2: Add footage to New Composition
You must create a new composition after importing your footage. To do this, go to Composition > New Composition and set the desired dimensions and duration. Then, move the footage from the project panel into the new composition.
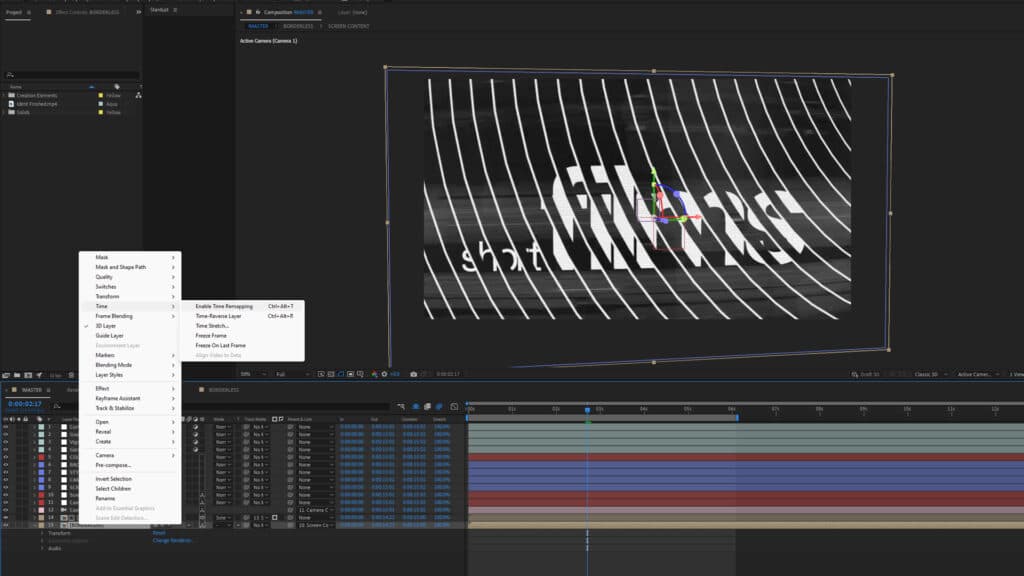
Step 3: Enable Time Remapping
To enable time remapping, right-click on the layer in the timeline panel and select Time > Enable Time Remapping. This will add keyframes at the start and end of your clip, showing the original length of the footage.
Step 4: Set & Adjust Footage Speed Between Keyframes
Keyframes must be set and adjusted to manipulate the speed of your footage. Move the time indicator to the point where you want to set a keyframe and click the stopwatch icon next to the “Time Remap” property in the timeline panel. This will add a keyframe at that position. Alter its position on the value graph to increase or decrease the speed between keyframes. You can also add keyframes by clicking the stopwatch icon at different points in the timeline and adjusting their position on the value graph.

Step 5: Refine Timing adjustments & Apply Effects or Transitions
After setting the keyframes and adjusting the speed, you can refine the timing of your footage by moving the keyframes and adjusting their positions on the value graph. Also, you can apply effects or transitions to specific sections of your footage by using masking techniques or layering multiple clips with different time-remapping settings.
Step 6: Export Your Video with the Time Remap Effect
Finally, export your video with the time remap effect. To do this, go to Composition > Add to Render Queue, select the desired output settings, and click “Render.” After Effects will process the composition and generate a new video file with the time remap effect applied.
Common Mistakes to Avoid When Time Remapping in After Effects
Time remapping is a great tool to add creativity to your videos. However, some common issues can trip a beginner up. Here are a few tips to avoid these pitfalls and get the most out of your time-remapping effects.
- Overextending footage: Just like overstretching an elastic band, be cautious not to stretch your footage too much, as it can result in a loss of quality.
- Inconsistent timing: Make sure to create smooth transitions between different speeds by adjusting the keyframes and using the speed graph effectively. Avoid abrupt speed changes that can make your video look jarring.
- Not refining timing: Take the time to fine-tune the timing of your footage by moving keyframes and adjusting their positions on the value graph. This can significantly affect your video’s overall flow and feel.
- Neglecting to experiment: Be bold and experiment with different time-remapping techniques and effects. Play around with varying keyframe positions, speed ramps, and transitions to create unique and visually appealing results.

Time Remapping FAQs: Common Questions
Still looking for A’s to your Q’s? Here are some common queries around time remapping in After Effects.
Can I apply time remapping to specific video clip sections?
You can apply time remapping to specific clip sections by setting keyframes and adjusting the speed between them. This allows you to create slow-motion or fast-motion effects in specific parts of your footage.
Can I reverse the playback of a video clip using time remapping?
Time remapping allows you to reverse a clip’s playback by setting keyframes and adjusting their positions on the value graph. This can create unique rewind or backward playback effects.
Can I combine time remapping with other effects or transitions in After Effects?
Absolutely! You can combine time remapping with other effects, transitions, and techniques in After Effects to create complex and visually stunning results. Experiment with layering, masking, and compositing to achieve your desired outcome.
How can I ensure smooth transitions between different speeds in my footage?
To achieve smooth transitions, use the speed graph and adjust the position of keyframes accordingly. This will create natural and visually pleasing speed ramps in your video.
Tips for Using Time Remapping Effectively in Your Videos
So, we now know what time remapping is, how to use it, and some basic dos and don’ts surrounding the process. Now it’s time to tweak your technique to use it effectively. Once you understand time remapping in After Effects, here are some tips to help you utilize this effect in your videos.
- Have a plan: Consider the timing and pacing of your shots during the shooting phase. This will simplify modifying the speed and timing of your footage during the editing stage.
- Try speed ramps: Utilize speed ramps to develop dynamic and captivating visuals. Gradually accelerate or decelerate the speed of your footage to emphasize or create dramatic effects.
- Merge time remapping with other effects: Be daring and join time remapping with different effects and techniques in After Effects. Experiment with color grading, transitions, and visual effects to upgrade your videos.
- Utilize keyframe interpolation: Employ keyframe interpolation to form smoother transitions between different speeds. Alter the bezier handles on the speed graph to manage the acceleration and deceleration of your footage.
- Be aware of audio: Adjust the audio accordingly when manipulating your footage’s speed. Speeding up or slowing down the video may require you to modify the pitch or duration of the audio for a seamless result.
Get Started with Time Remapping in After Effects Today!
You should now be able to master the art of time remapping in After Effects confidently – just try not to hit 88mph when messing around with it! While we’re on the topic, learn How to Animate a Logo in After Effects or check out these Top 15 After Effects Transitions. Or, head to Envato Elements to peruse the huge selection of After Effects templates and start creating today. Happy editing!


